스마트폰 3G 패킷 캡쳐방법에 대해 알아보다 확인한 내용을 기록 합니다. 방법은 3G 통신으로 VPN 서버로 연결, 그리고 VPN 서버측에서 패킷을 캡쳐하는 것입니다. 그럼 VPN 서버를 셋팅해 봅시다.
1. PPTPD 설치
환경은 VMware에 설치된 Ubuntu 에서 작업 하였습니다. Network Adapter는 Bridged로 설정하여 공유기에 바로 연결합니다. 그럼 이제 pptp를 설치 합니다.
tester@ubuntu:~$ sudo apt-get install pptpd
[sudo] password for tester:
Reading package lists... Done
Building dependency tree
Reading state information... Done
The following extra packages will be installed:
  bcrelay
The following NEW packages will be installed:
  bcrelay pptpd
0 upgraded, 2 newly installed, 0 to remove and 221 not upgraded.
Need to get 95.1 kB of archives.
After this operation, 338 kB of additional disk space will be used.
Do you want to continue [Y/n]? y
Get:1 http://us.archive.ubuntu.com/ubuntu/ raring/main bcrelay amd64 1.3.4-6ubuntu1 [11.5 kB]
Get:2 http://us.archive.ubuntu.com/ubuntu/ raring/main pptpd amd64 1.3.4-6ubuntu1 [83.7 kB]
Fetched 95.1 kB in 2s (47.1 kB/s)
Selecting previously unselected package bcrelay.
(Reading database ... 155358 files and directories currently installed.)
Unpacking bcrelay (from .../bcrelay_1.3.4-6ubuntu1_amd64.deb) ...
Selecting previously unselected package pptpd.
Unpacking pptpd (from .../pptpd_1.3.4-6ubuntu1_amd64.deb) ...
Processing triggers for man-db ...
Processing triggers for ureadahead ...
ureadahead will be reprofiled on next reboot
Setting up bcrelay (1.3.4-6ubuntu1) ...
Setting up pptpd (1.3.4-6ubuntu1) ...
Starting PPTP Daemon: pptpd.
Processing triggers for ureadahead ...
2. IP 설정, \'pptpd.conf\' 파일 수정
이제 설정을 해봅시다. 설정 파일은 /etc/pptpd.conf 이며 제일 아래에 있는 아래 두줄만 수정합니다. 여기서 \'localip\'는 VPN 서버의 IP를 의미하고 \'remoteip\'는 VPN 서버로 연결되는 기기, 즉 스마트폰이 받을 IP를 의미합니다.
localip 192.168.0.20
remoteip 192.168.0.100-200
3. 계정 설정, \'chap-secrets\' 파일 수정
다음은 계정 설정입니다. 설정파일은 /etc/ppp/chap-secrets 파일 입니다. 이 파일을 동해 VPN 서버로 접속하기 위한 계정을 설정합니다. 전 아래와 같이 설정했습니다. \'testtest\'
# Secrets for authentication using CHAP
# client        server  secret                  IP addresses
test    *       test    *
4. DNS 설정, \'pptpd-options\' 파일 수정
DNS 설정을 합니다. 설정파일은 /etc/ppp/pptpd-options 입니다. 다른 부분은 수정하지 말고 아래 두줄만 다음과 같이 수정합니다. DNS는 구글DNS로 설정했습니다.
ms-dns 8.8.8.8
ms-dns 8.8.4.4
5. 커널 IP forwarding 설정, \'sysctl.conf\' 파일 수정
커널에서 IP forwarding이 가능하도록 설정합니다. 설정파일은 \'/etc/sysctl.conf\' 이며 아래와 같이 주석을 제거 합니다.
# Uncomment the next line to enable packet forwarding for IPv4
net.ipv4.ip_forward=1
그리고 바로 적용합니다.
tester@ubuntu:~$ sudo sysctl -p
net.ipv4.ip_forward = 1
6. pptpd 데몬 시작
이제 pptpd를 재시작 합니다. 1723 포트가 잘 올라왔는지 확인합니다.
tester@ubuntu:~$ sudo /etc/init.d/pptpd restart
Restarting PPTP:
Stopping PPTP: pptpd.
Starting PPTP Daemon: pptpd.
tester@ubuntu:~$ netstat -nat
Active Internet connections (servers and established)
Proto Recv-Q Send-Q Local Address           Foreign Address         State
tcp        0      0 127.0.1.1:53            0.0.0.0:*               LISTEN
tcp        0      0 127.0.0.1:631           0.0.0.0:*               LISTEN
tcp        0      0 0.0.0.0:1723            0.0.0.0:*               LISTEN
tcp6       0      0 ::1:631                 :::*                    LISTEN
7. 공유기 설정(포트포워딩)
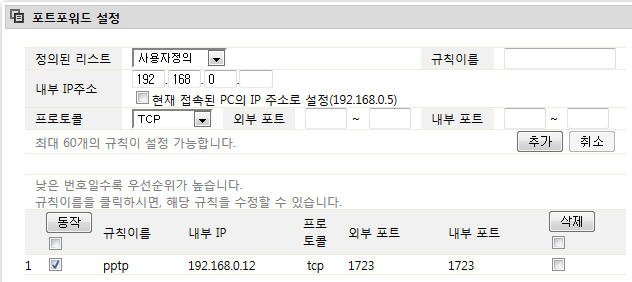
1723 포트가 PPTP VPN 포트 입니다. 이제 공유기에서 포트 포워딩을 통해 설정을 하고 스마트폰에서 연결해 봅시다! 저는 IPTIME 공유기를 사용합니다. 다른 공유기 설정은 알아서들 하셔요 🙂
설정은 \'고급설정\' - \'NAT/라우터 관리\' - \'포트포워드 설정\' 메뉴 입니다. 아래와 같이 설정 합니다. 여기서 내부 IP는 Ubuntu 내부 IP 입니다.
8. 스마트폰으로 접속
아이폰만 보유하고 있어 아이폰 기준으로 설정을 드리겠습니다. 먼저 \'Settings\' - \'General\' - \'VPN\' 메뉴로 들어서 VPN을 추가 합니다. 설정은 아래와 같이 합니다. 여기서 Server는 역시 공유기가 연결된 공인 IP로 하시면 됩니다.
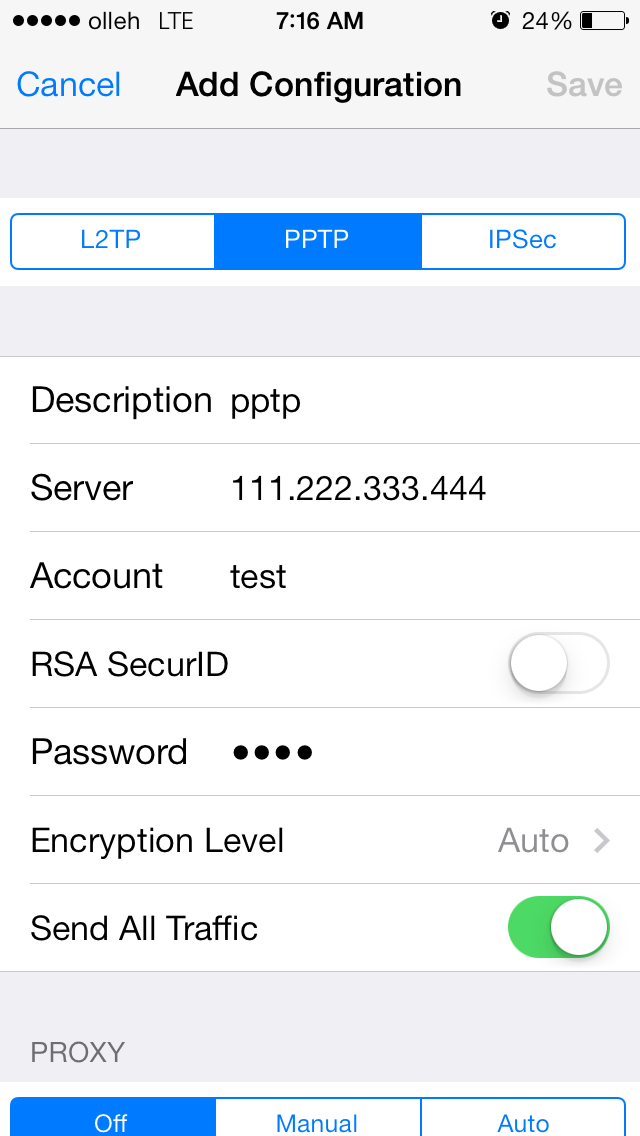
이제 VPN을 아래와 같이 켜면 연결이 됩니다. 아래와 같이 설정된 IP가 잘 셋팅이 되었는지 확인합니다.
이제 패킷을 잡아보세요 ~